Welcome back to my series on using Postman with Jamf Pro. If you haven’t checked out the previous posts, or you’ve never used Postman with the Jamf Pro API, you may want to go read through these:
Using Postman for Jamf Pro API Testing – Part 1: The Basics
Using Postman for Jamf Pro API Testing – Part 2: Creating And Updating Policies
I’ve decided to change the title of this series, slightly, to reflect the fact that Postman can be used for far more than simply testing the API, but actually using the API to get work done. In the upcoming posts in this series I will go over the use of variables for more than just storing username and password and how to use the Runner functionality to run more than one API command.
But before we get too far into this post, I wanted to bring up an important update that is coming to the Jamf Pro Classic API: the use of Bearer Tokens for authorization. Up until the 10.35 release of Jamf Pro, the only method for authentication was “Basic Authentication” which meant the sending of a username and password combination. From a security standpoint, this is not the best way to do API calls. When Jamf released the “Jamf Pro API” they made it to only work with OAuth (ROPC grant type). This is more secure than basic auth and now they have brought that to the Classic API (sidebar: to read more about the two API frameworks in Jamf Pro, go here.) The release notes for 10.35 have a link to the changes made in the Classic API for authentication. In these notes it is mentioned that the Basic Authentication method has been deprecated and will be removed later this year.
Ok, back to our series. In our last post I showed you how to use Postman to create and update a policy. We also talked about how to create Collections within Postman to store these API requests for later use. By creating API requests for specific tasks we will be able to re-use them more quickly, and as you’ll see in a later post, we can use them via a Runner to perform more than one request at a time.
Create A Smart Group
Just like creating a Policy, creating a Computer Group can be as simple as providing just a name for the group, or it can be as complicated as setting the the criteria for a Smart Group. We are going to create a Smart Group that searches for all computers that have not checked in for more than 90 days. I feel like this is a typical task that a Jamf admin might complete.
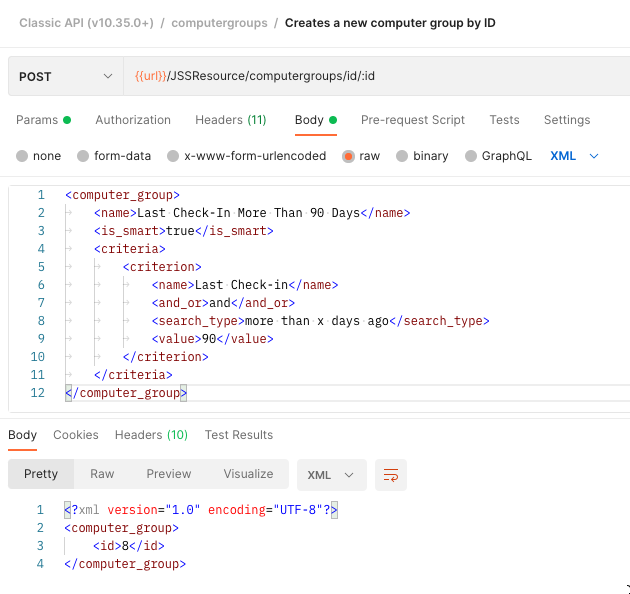
We are going to be using the “Create Computer Group by ID” POST call from within Postman. The API endpoint on a Jamf Pro server for this is:
/JSSResource/computergroups/id/<id>The default XML code that is provided in Postman is as follows:
<computer_group>
	<name>Group Name</name>
	<is_smart>true</is_smart>
	<site>
		<id>-1</id>
		<name>None</name>
	</site>
	<criteria>
		<criterion>
			<name>Last Inventory Update</name>
			<priority>0</priority>
			<and_or>and</and_or>
			<search_type>more than x days ago</search_type>
			<value>7</value>
			<opening_paren>false</opening_paren>
			<closing_paren>false</closing_paren>
		</criterion>
	</criteria>
</computer_group>
We can provide as much information as we want, or as little. For our Smart Group we’re going to use the following:
- Name: Last Check-In More Than 90 Days
- Is_smart: true
- Criterion Name: Last Check-in
- Criterion and_or: and
- Criterion Search_type: more than x days ago
- Citerion Value: 90
The rest of the information in the XML is optional. Since we are only providing one criteria we do not need to worry about the “opening_paren” or “closing_paren” fields. With our specific information, our new XML should look like this:
<computer_group>
	<name>Last Check-In More Than 90 Days</name>
	<is_smart>true</is_smart>
	<criteria>
		<criterion>
			<name>Last Check-in</name>
			<and_or>and</and_or>
			<search_type>more than x days ago</search_type>
			<value>90</value>
		</criterion>
	</criteria>
</computer_group>
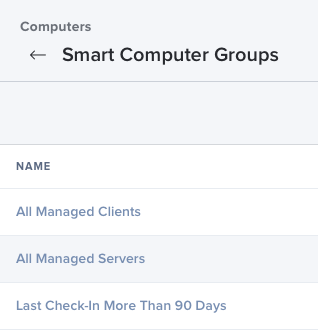
If we send that to Jamf via Postman, we should have a new Smart Computer Group in our Jamf Pro server.
Pretty simple, right? From here we can get more complicated if we need to, adding more criteria to the query. Perhaps we want to refine our search to machines that haven’t checked in for more than 90 days and that have Adobe Photoshop 2021 installed. This type of search would allow us to identify stale Photoshop licenses. The XML for that Group might look like this:
<computer_group>
	<name>Adobe Photoshop Stale Licenses</name>
	<is_smart>true</is_smart>
	<criteria>
		<criterion>
			<name>Last Check-in</name>
			<and_or>and</and_or>
			<search_type>more than x days ago</search_type>
			<value>90</value>
		</criterion>
		<criterion>
			<name>Application Title</name>
			<and_or>and</and_or>
			<search_type>is</search_type>
			<value>Adobe Photoshop 2021.app</value>
		</criterion>
	</criteria>
</computer_group>
As you can see, it’s easy to create these groups. If you need to do more complicated Smart Groups, you can always create the group in the Jamf Pro interface and then use the GET call in Postman to inspect the XML. Using that method will allow you to understand how to construct even more complicated groups (like those with parenthesis and such).
Modify A Smart Group
When it comes to modifying an existing Smart Group, the process is very similar to the creation process. I suggest using the GET method to find the Smart Group you need to modify, then copy the XML out, make the changes, and paste that into the PUT method for updating.
Let’s use our last example from above, the Adobe Photoshop Smart Group. Maybe we made a mistake and it’s not the 2021 version we want to find, but the 2020 version. From my demo server, using the GET method, I get the following XML returned:
<?xml version="1.0" encoding="UTF-8"?>
<computer_group>
    <id>9</id>
    <name>Adobe Photoshop Stale Licenses</name>
    <is_smart>true</is_smart>
    <site>
        <id>-1</id>
        <name>None</name>
    </site>
    <criteria>
        <size>2</size>
        <criterion>
            <name>Last Check-in</name>
            <priority>0</priority>
            <and_or>and</and_or>
            <search_type>more than x days ago</search_type>
            <value>90</value>
            <opening_paren>false</opening_paren>
            <closing_paren>false</closing_paren>
        </criterion>
        <criterion>
            <name>Application Title</name>
            <priority>0</priority>
            <and_or>and</and_or>
            <search_type>is</search_type>
            <value>Adobe Photoshop 2021.app</value>
            <opening_paren>false</opening_paren>
            <closing_paren>false</closing_paren>
        </criterion>
    </criteria>
    <computers>
        <size>0</size>
    </computers>
</computer_group>
For me to change the version I want to look at, the Application Title, I need to send the following XML to the server:
<computer_group>
    <id>9</id>
    <name>Adobe Photoshop 2020 Stale Licenses</name>
    <criteria>
        <criterion>
            <name>Last Check-in</name>
            <priority>0</priority>
            <and_or>and</and_or>
            <search_type>more than x days ago</search_type>
            <value>90</value>
            <opening_paren>false</opening_paren>
            <closing_paren>false</closing_paren>
        </criterion>
        <criterion>
            <name>Application Title</name>
            <priority>0</priority>
            <and_or>and</and_or>
            <search_type>is</search_type>
            <value>Adobe Photoshop 2020.app</value>
            <opening_paren>false</opening_paren>
            <closing_paren>false</closing_paren>
        </criterion>
    </criteria>
</computer_group>
Again, using the PUT method, sending that XML to the server will update the Smart Group. You can see that now we’ve corrected the name of the Group and we’ve changed the Application Title we are looking for:

Wrap Up
That’s it for Smart Groups. Using the skills you’ve learned with the previous post and this one, you should be able to leverage the API via Postman to create, update, list, and delete just about any object in the Jamf Pro server.
Next up in our series we’re going to talk about variables and the Runner functionality. Leveraging these two things will allow us to create batch jobs to do things like setup policies or create smart groups or even delete items. So stay tuned for that next post.


2 responses to “Using Postman with Jamf Pro Part 3: Computer Groups”
[…] Using Postman with Jamf Pro Part 3: Computer Groups […]
[…] Using Postman with Jamf Pro Part 3: Computer Groups […]