In my previous post I walked through the basic steps necessary to get Postman ready to do API requests to your Jamf Pro server. In this post we’ll get into using Postman and the API to create and update policies, including saving our API requests so we can use them again.
Before we get started I feel like I need to re-iterate my disclaimer:
Prod is NOT test. Be careful with your updates, deletes, and creates. I highly suggest practicing in a dev environment first if you can. If you do not have a dev environment, then use test items like test policies and test computers. The API is a powerful tool.
Ok, now that the disclaimer is out of the way, let’s get to it!
Create a New Policy
You can create a policy with as little information as the name of the policy, or with as much information as the packages to install, scripts to run, and just about anything else you can do in the GUI. One thing I know you cannot do is remove the Restart options from a policy you create. Even if you do not set anything in the Restart section of XML, the policy will still create with that “tab” added to the policy.
UPDATE January 2022: Well, my friend Rich Trouton proved me wrong on the above paragraph. Turns out there is a way to remove the Restart options from a policy. Rather than re-write what he wrote, I direct you to his blog post, Removing the Restart Options section from Jamf Pro policies using the API.
The Jamf Pro API takes XML code blocks to create pieces. If we were to open the POST request for creating a policy (title: “Creates a new policy by ID”) we would see a basic representation of some of the information we can send using this request to create a policy.

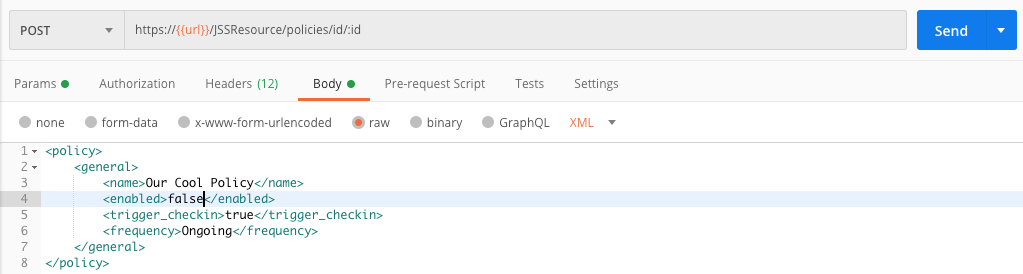
Let’s say we wanted to just create a shell of a policy that had a name, a trigger, and a frequency. That XML would look something like this.
<policy>
	<general>
		<name>Our Cool Policy</name>
		<enabled>false</enabled>
		<trigger_checkin>true</trigger_checkin>
		<frequency>Ongoing</frequency>
	</general>
</policy>
We would put that block of XML into the Body section of our API request.
If we were to run that by clicking the Send button we would now have a policy named “Our Cool Policy” that was not enabled, with a trigger of Recurring Check-in, and a frequency of Ongoing. Pretty cool. The Jamf Pro API returns the ID of our new policy and Postman displays that for us.
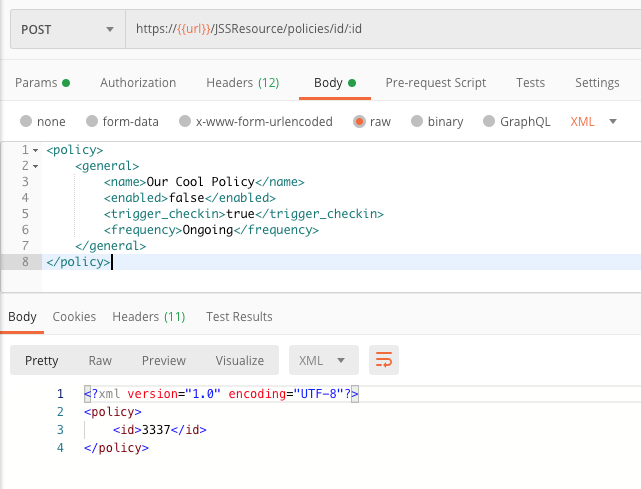
We can go open up our JPS web interface to look up that policy, but why not just use Postman to look at it. Go find the GET request named “Finds policies by ID” and enter that new policy ID into the “id” Key under Path Variables. Just replace {{id}} with the ID number returned after we ran our POST request.


Now if we run that GET request we’ll get a bunch of XML back showing our new policy, even though we only entered a few items.

Look at all that info! Now, if you’re more of a visual person and need to see it in the web interface, by all means go pull up the policy. We’ll wait until you come back.
Sidebar: When you close out the GET request where we wrote over the {{id}} variable, do not save the request. We want the variable to be there for later use. I’ll show you later in this post a better way to put the ID value in.
That was all neat and all, but what about installing a package as part of the policy? For us to do that we would need a little bit of information about the package. We will need to add the ID of the package and we will need to add the action we want to take (install or cache).
You can grab the package information straight from the web interface, from Jamf Admin, or even better, right from the API here in Postman. This time I’ll let you figure it out on your own. Go find the GET request to list packages and then locate the ID of the package you want to install in our policy.
For my demo I’ll be using a package ID of 1265 and an action of Install. Here’s what the XML looks like.
<policy>
    <general>
	<name>Our Cool Policy</name>
	<enabled>false</enabled>
	<trigger_checkin>true</trigger_checkin>
	<frequency>Ongoing</frequency>
    </general>
    <package_configuration>
        <packages>
            <size>1</size>
            <package>
                <id>1265</id>
                <action>Install</action>
            </package>
        </packages>
    </package_configuration>
</policy>
If we replace our XML in our POST request and run this in Postman, we will get error because there is already a policy named “Our Cool Policy”. We’re going to pretend like we didn’t already create that policy since we’re talking about creating new policies. I’ll discuss updating an existing policy later. (Of course, we could just use Postman to delete the test policy we created above, or use the GUI to delete the policy before we continue on.)
After running the POST we now have a policy in Jamf Pro that is disabled but has a package attached to it.

There you have it, we’ve created our very first policy that actually does something. Of course we would still need to put a scope on the policy and enable it, so why don’t we do that now.
Updating A Policy
Let’s continue building on the policy we were creating above. The ultimate goal of this policy is to be an installer policy that can be used on any computer and triggered via a Custom Trigger. This is one of the methods many Mac admins use for doing installs: have an install policy and call that install policy from other policies or scripts. Go watch Bill Smith’s (@meck or Talking Moose) JNUC presentation from 2017 titled “Moving Beyond “Once Per Computer” Workflows” for more info behind this.
We already have the framework of our policy created we just need to make a few changes and additions. We’ll need to do the following to make this into a true installer policy:
- Change the trigger to a custom trigger
- Add an inventory update
- Add a scope
- Add a category
We will want to use the PUT request named “Updates an existing policy by ID” to do these updates. Once again, we only need to put in the XML for items we need to change or add to the policy.
<policy>
    <general>
        <trigger_other>install-our-cool-app</trigger_other>
        <trigger_checkin>false</trigger_checkin>
        <category>
            <id>14</id>
        </category>
    </general>
    <scope>
        <all_computers>true</all_computers>
    </scope>
    <maintenance>
        <recon>false</recon>
    </maintenance>
</policy>
Those are all the XML keys that we’ll need to update in our policy (category ID 14 is the category where I put installers). We’re going to drop that XML into the body section of our API request and we’re going to set the ID variable again like we did above. Just put the ID number of our cool policy.


After running that API request, our installer policy should be all set and ready to be enabled.

Collecting Our Requests
Now that we’ve used a couple of different API requests, let’s put those into a collection that we can re-use later when we need to do the same thing. Let’s create a collection of requests for manipulating our policies.
Click on the down arrow next to the Save button next to the Send button and choose Save As.

In the window that opens, go ahead and give your request a descriptive name, you can even give it a description. Since this is the first request we’re saving, we’ll want to create a collection for it. Click on the “+Create Collection” link towards the bottom of the window. Give your collection a good name and click the orange checkmark.
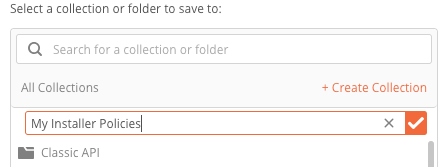
Finally, click the big orange Save button at the bottom.

Continue saving all of the requests that you want to use when creating these installer policies, or whatever type of policy. Just remember, if you have changed the ID key from {{id}} to a number, change it back to {{id}} before saving. You’ll see why in a minute.
Now that we have all of these requests in one location, it makes it easier for us in the future when we need to create or update the policy. If we set all of the XML in the POST, then in the future we just have to edit those values in the XML for the new policy.

In a future post, we’ll go over a method for converting those values into variables that we can feed with a JSON file or CSV file so that we do not have to edit our request.
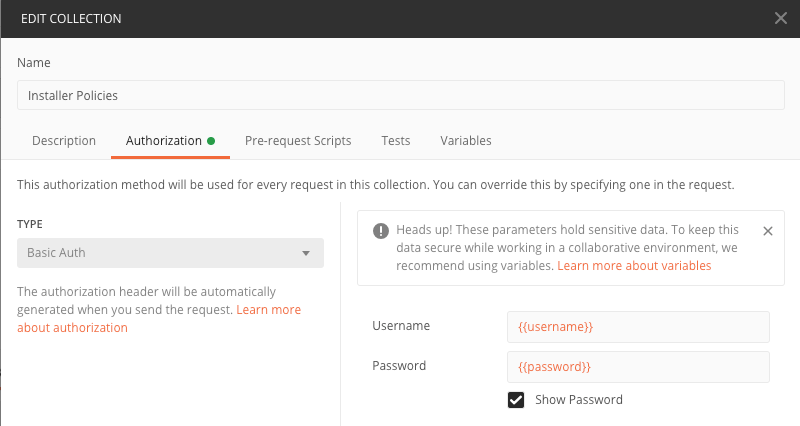
One more thing you’ll need to do. The Classic API collection from Jamf comes with the authentication variables username and password already configured. We’ll need to do that to our new Installer Policies collection.
Click on the ellipses, the three dots, to the right of our collection name and choose Edit.

In the window that opens, click on the Authorization tab. Now click on the drop down box on the left and choose Basic Auth. Fill in the username and password boxes with the variables that we need. Once you have done that click on the orange Update button at the bottom.
Using Variables
I told you I’d show you how to use variables, like the {{id}} variable we’ve already seen. We’re going to use the “Pre-request Script” section of our request window to fill those variables. We use this method rather than directly editing the “Path Variables” on the Param tab so that we can re-use our API request in a more automated fashion later.
On the “Pre-request Script” tab you’ll notice some snippets on the far right. Click on the “Set an environment variable” snippet to add the code to the window.

I’ll bet you can figure out what we’re going to do, right? Yep, go ahead and replace “variable_key” with the variable “id”. Now anytime you want to do an PUT (update) or a GET (retrieve) for a specific policy, you can simply put the policy ID in the “variable_value” field.
For example, if we wanted to update (PUT) our cool installer policy, id = 3338, we would simply add that ID.
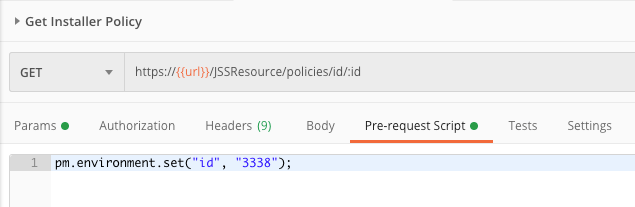
When we send that request, the ID variable on the Params tab will get switched out with the ID we placed here in our Pre-request script. That will in turn replace the “:id” in the URL of our request. Clear as mud, right?
Wrap Up
We covered a lot here, a lot more than I expected. Postman is a pretty powerful tool for learning about the Jamf Pro API and how to use it to manipulate your environment. I would suggest doing some Google searches and watching some YouTube videos on how to use Postman to get more advanced.
In our next post we’ll talk about creating and editing computer groups.
Until next time!
4 responses to “Using Postman for Jamf Pro API Testing – Part 2: Creating And Updating Policies”
[…] Using Postman for Jamf Pro API Testing – Part 2: Creating And Updating Policies […]
[…] Using Postman for Jamf Pro API Testing – Part 2: Creating And Updating Policies […]
[…] Using Postman for Jamf Pro API Testing – Part 2: Creating And Updating Policies […]
[…] can allow us to set variables before the running of a request. We used a pre-request script in Part 2 when we briefly talked about using variables. In that instance we used the command […]