I have dabled with Postman for years but I was never able to grok the full power of the app until recently. As our environment has grown (16,000+ Mac endpoints under management) we have noticed a slow down in the response time of the Jamf Pro web interface. It’s the nature of having several hundred Smart Groups, a few thousand policies, and all of the other things that go along with a large environment.
That’s where Postman comes in. Postman allows us to make API calls to the Jamf Pro server in a nice GUI environment and without needing to know a lot about creating those calls. But the true power is in the ability to throw collections of information at an API and have Postman run through that information using a Runner. We’ll get into runners and other features in another post. This post is really about setting up Postman for use with Jamf Pro.
On that note, Postman is a powerful tool and as such this post will not be able to cover everything. I suggest using the Postman Learning Center, Google, and YouTube to get more information. There’s only so much I can cover.
Setup the Environment
First, go grab a copy of Postman if you do not already have it and after that, go grab Jamf’s collection of API calls for Postman (EDIT Jan 2022: If you previously grabbed this, go back and check for the updated version with API calls for v10.35 and higher).
In Postman we will want to create an environment to store variables. This will be things like the user, password, and URL for connecting to your Jamf environment. These variables are shown in the interface as double curly braces surrounding a variable name, like {{somevariable}}. The collection of API calls from Jamf uses {{url}} for the JSS URL variable, {{username}} for the user, and you guessed it, {{password}} for the password.
Click on the gear icon in the upper right corner of the screen to add an environment to Postman.
In the window that opens up you’ll want to click the big orange Add button in the bottom right corner.
<image removed>
Give your environment a name, something descriptive like “Production Server” or “Dev Server” or “My L33T JSS”. Next you’ll want to fill in the variable names and values you want them set to.
<image removed>
Once you are satisified, go ahead and click Add to close this window, and then use the X to close the next window. That should put you back into the main Postman window, most likely at the launchpad.
UPDATE January 2022 – a new version of Postman dropped after this post, so I’m updating this section.
In Postman, in the upper right corner next to the environment dropdown, click the icon that looks like an eye. This will open a dialog window. Click the Add button to the far right of the Environment header.

This will open a table view that will allow you to add the variables we will want. Give your new environment a name (1), set your variables in the table (2), click Save (3), and then use the X to close the environment tab.

Adding Collections
Now that we have our environment variables set, we’ll want to add in the Jamf Collection of API calls. Click on the Import button at the top left of the window.
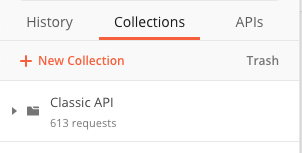
Now drag and drop the JSON file you downloaded from the Jamf GitHub repo into the window. You should now have a new collections folder under the Collections tab on the left side named “Classic API”.
That’s it! We’re now setup to use Postman and the Jamf Classic API Collection to make API calls to our Jamf Pro server.
Our First API Call
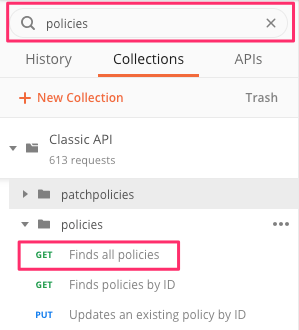
Now that we’re all set up, let’s try one very basic API call. Let’s grab a list of all of our policies. You can navigate through the collection folder until you find the Policies endpoint, or you can use the Filter field above the collections list. I’m going to type policies into that filter so I can get to the “Find all policies” API call.
Choose your environment in the upper right of the window and then click the Send button. You should get back a list of all of the policies in your JPS.
What’s Next
Now that we have Postman setup we can do a lot of things with the API. We can list things, read values of objects, we can update objects, we can even create new objects via the API. Here’s the obligitory warning:
Prod is NOT test. Be careful with your updates, deletes, and creates. I highly suggest practicing in a dev environment first if you can. If you do not have a dev environment, then use test items like test policies and test computers. The API is a powerful tool.
Next in the series of posts on Postman, we’ll cover how to use environment variables in our API calls to fill in things like the ID number of a computer, how to use Postman to create, update, and delete objects, and we’ll cover some more advanced topics like using “Runners” to run multiple iterations of a call or even run multiple API calls in series.
Until next time, have some fun with Postman, but be careful!


5 responses to “Using Postman for Jamf Pro API Testing – Part 1: The Basics”
[…] my previous post I walked through the basic steps necessary to get Postman ready to do API requests to your Jamf Pro […]
I have seen you in Jamf Nation for years and all of your posts are helpful. Thanks for this and all your efforts in the community as a whole.
[…] Using Postman for Jamf Pro API Testing – Part 1: The Basics […]
[…] Using Postman for Jamf Pro API Testing – Part 1: The Basics […]
[…] Using Postman for Jamf Pro API Testing – Part 1: The Basics […]