In my two previous posts, I talked about deploying AutoPkg and Jenkins. AutoPkg allows us to build packages from common apps, like Adobe Flash or VLC, using recipes. This allows for all of the guess work to be done through automation. Then with Jenkins, we deployed a Continuous Integration server that allows for the scheduling of tasks, thus getting us closer to full automation.
Jenkins & AutoPKG Together
Now that we’ve got AutoPkg and Jenkins installed, it’s time to configure them to work together and get some automation going. Hopefully you’ve installed both AutoPkg and Jenkins on the same machine.
When installing Jenkins, the software creates a new user aptly named “jenkins” on your system. When Jenkins is running tasks, it will run these tasks as the jenkins user. In order for us to run AutoPkg as Jenkins, we will need to configure things like the CACHE_DIR and the repositories for Jenkins to use.
First thing we need to do is reset the Jenkins user’s password. So login to your Mac as the admin user (or ssh in if you’d like). Open a Terminal window and issue the following command:
sudo passwd jenkins
You will then be prompted to enter a password for the jenkins account. Go ahead and enter whatever password you want, just make sure it’s one you will remember. Once you’ve done that, go ahead and logout of the admin account.
Now login to the machine as the Jenkins user and open the Terminal. We need to set the CACHE_DIR for the jenkins user, just like we did in our AutoPkg post. From the command line in Terminal, enter the following:
defaults write com.github.autopkg CACHE_DIR /path/to/cache/dir
In our previous post, we said “/paht/to/cache/dir” was a path to a local directory on your system. In our example we used /Autopkg_done. So our command was:
defaults write com.github.autopkg CACHE_DIR /Autopkg_Done
Now that we’ve set the CACHE_DIR, we need to set the locations for the repositories we’re going to use:
autopkg repo-add https://github.com/Jaharmi/autopkg_recipes
 autopkg repo-add http://github.com/autopkg/recipes.git
 autopkg repo-add https://github.com/hjuutilainen/autopkg-recipes
 autopkg repo-add http://github.com/keeleysam/recipes
The Jenkins user should now be set to utilize autopkg. Now we need to figure out which recipes we want Jenkins to build for us, and how often we want this to happen.
Given the frequency at which Adobe Flash is updated, this is probably a good one to have in Jenkins. So we’ll use that recipe as our example. Go ahead and pull up the Jenkins dashboard (http://localhost:8080).
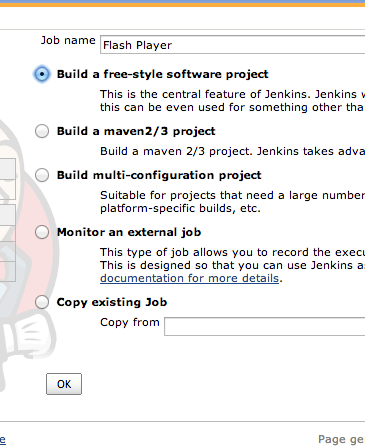
Click on the New Job link to the left side of the dashboard. On the page that comes up, enter a name for this new job, and choose to “Build a free-style software project”. In our example, I’m creating a job named “Flash Player”.
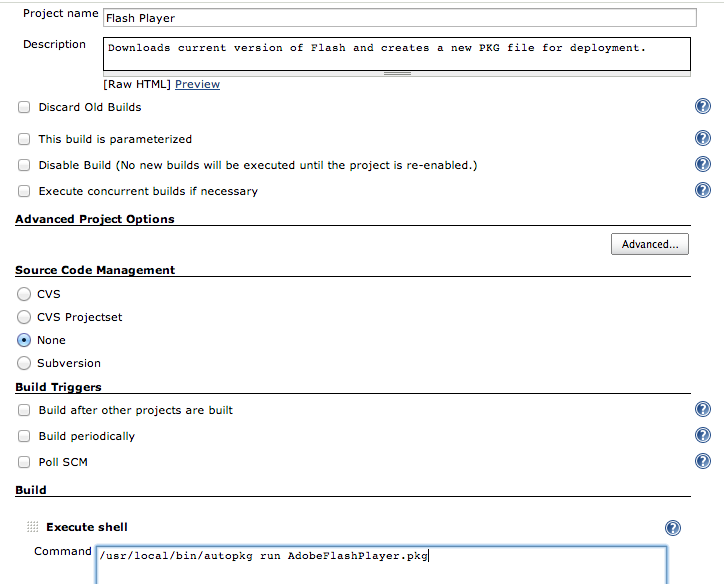
The next page that we are presented with asks for a bunch of different information about the job (project) we are creating. You can give a description, set it to discard old builds, use source code management, and plenty of other things.
For this example, we’ll give the job a description and then we’ll tell Jenkins what to actually do using the Build drop down box (Add build step). We will be using the build step “Execute Shell”.
Our shell command that we will have Jenkins execute is the command line commands to run the autopkg recipe for Flash.
Once we’ve set our configuration, simply click on the Save button to save the job into Jenkins list of jobs.
Now that our job is built, we will need to schedule it to run. We can do this in two ways:
1) We can schedule each job to run individually on its own schedule, or
2) We can create a job in Jenkins that triggers the jobs we want to run.
We’re going to focus on the second option, triggering all builds via a single job.
Start a new job, and this time give a name like “Daily AutoPkg Builds” and the type of job is “Build multi-configuration project”.
On the configuration page that comes up, go ahead and set a job description if you’d like, but the first area we’ll be really concerned with is the Build Triggers. IN here we want to select the Build Periodically check box. This will give us a new box to enter a schedule in using the standard UNIX cron parameters:
 If you’re not familiar with cron parameters, click on the blue question mark to the right of the Build Periodically line. This will give you a great explanation of the parameters you want. In the screen shot above, we are set to run this everyday of every month at 6 am.
Next up, we need to tell this project what to do. Under the Post-Build Actions section towards the bottom, you want to select Build Other Projects. In the field that opens up, you want to then type the names of each of the projects you want to build. Don’t worry if you cannot remember the exact names, as you type the names of projects will appear just below the box. Just choose the ones you want.
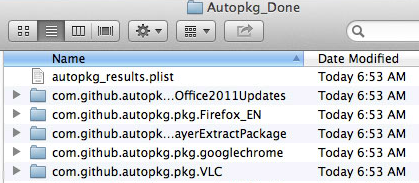
 That’s it. Just click on the Save button at the bottom of the page, and you’ve now created a system for building these software packages each morning. Each morning you can come in and check the Autopkg_Done directory to find your packages already built:
 As you can see, each of those folders was updated this morning. This provides me with the latest versions of those apps/plug-ins for me to then import into whatever management app I’m using, whether it’s Casper, Absolute Manage, or something else.
NOTE: Since AutoPKG was developed by Greg Neagle and Tim Sutton, there are built-in recipes for importing directly into Munki. I have reached out to JAMF for the possibility of having the same feature made available for Casper. It may be some time before we are there, but at least we can get our packages built automatically.
This is just the tip of the iceberg when it comes to using Jenkins. You can configure Jenkins to send out RSS updates or emails when packages are built or when they fail. Dig into the documentation and start to tweak it to your needs.
Don’t be afraid to roll up your sleeves.


One response to “Jenkins & AutoPKG – Love At First Sight”
To give credit where credit is really due: AutoPkg was actually started by Per Olofsson (http://magervalp.github.io) in 2010 . Some core portions of the code remain largely unchanged since then!